Firmware compiling
Warning
This procedure lists the steps required to properly compile the firmware’s source code. It is only recommended if the user intends to modify the firmware for a very particular application. For regular use, the user is advised to use the precompiled version included with the Supplementary Files (See Supplementary Method on firmware programming). This section assumes that the user has installed AtmelStudio and the version control software git.
1. Installing the Arduino Libraries
The firmware uses the Arduino libraries to read from the SD card. In order to have access to those libraries, the user must obtain a compiled copy of the Arduino libraries and include them in the firmware project inside Atmel Studio. The following procedure must be followed:
- Go to https://www.arduino.cc/en/Main/Software and download the Arduino Integrated Development Environment (IDE) Windows installer.
- Run the installer. Accept the License Agreement, and the defaults in the following windows. The installer will install the Arduino IDE. Click on “Close” when installation is finished.
- Open the Arduino IDE. We need to enable verbose mode to locate the compiled libraries. Go to File -> Preferences, and check “Show verbose output during compilation”. Click on the “OK” button.
- We must select a board that uses the ATMega328, which is the microcontroller used in the LPA. Go to Tools -> Board, and make sure that “Arduino Uno” is selected.
- Compile the default sketch (or any other sketch) by going to Sketch -> Verify/Compile. The black bottom panel in the window will be filled with messages. One of the last messages will start with something similar to “C:Users{Your User Name}AppDataLocalTempbuild3717660540954573100.tmp/”. This is the path of the folder in which the Arduino IDE has placed the compiled Arduino libraries. Open this folder on Windows Explorer.
- We need to create a folder to store the compiled libraries. We will do it in the Atmel Studio working directory (by default it is “My DocumentsAtmel Studio”). Open this folder and create a directory called “arduinoCore328”.
- Go back to the folder that you opened in step e. The file “core.a” contains the compiled Arduino libraries. Copy this file into the arduinoCore328 folder and rename it to libcore.a. The arduino library is now ready.
2. Downloading and Building the Firmware
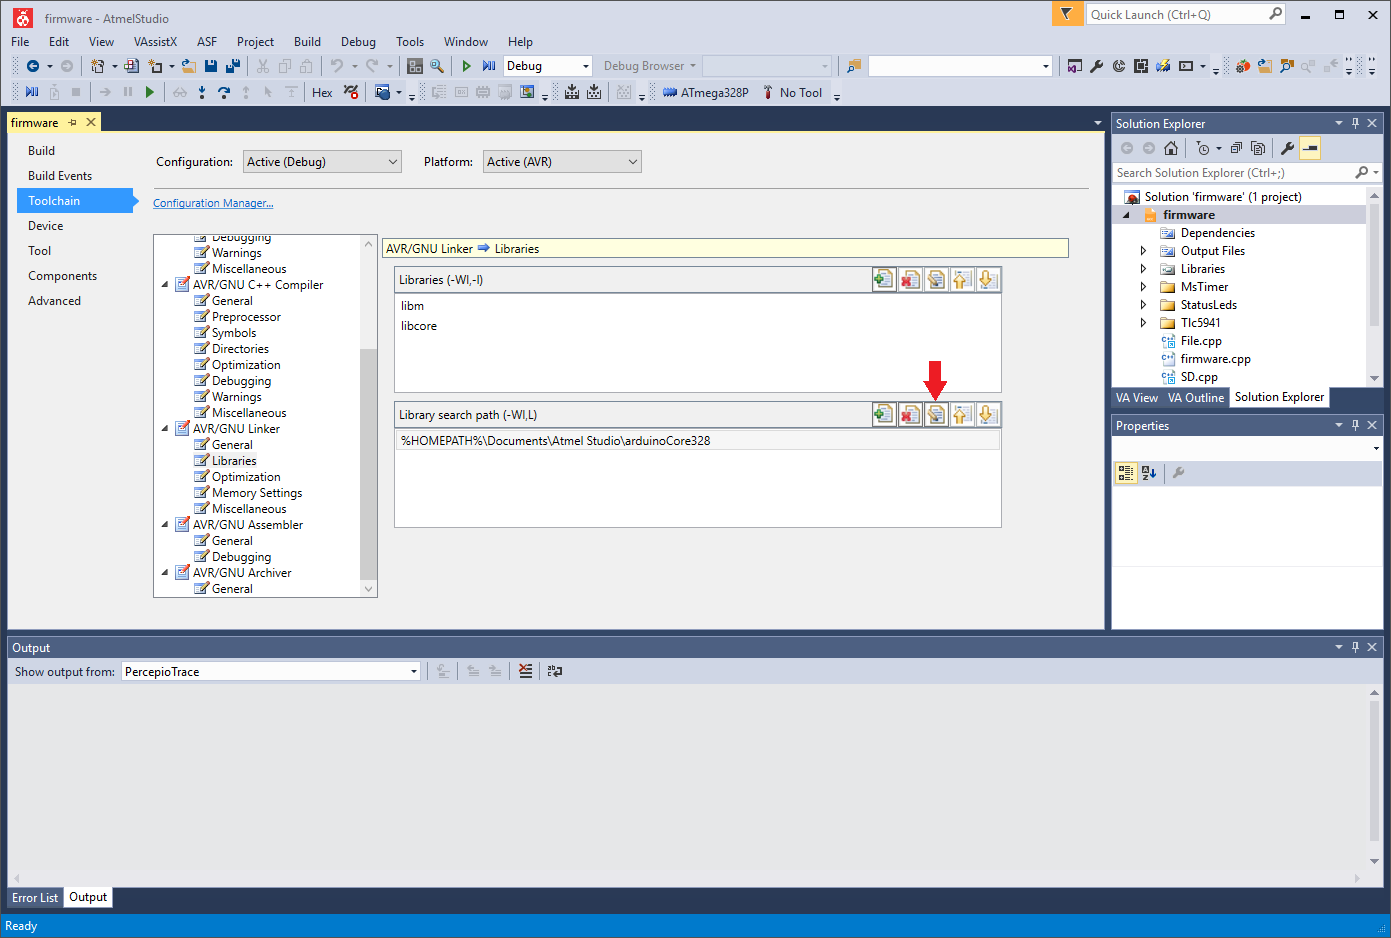
On the firmware project properties panel, the “Toolchain” option (left) has been selected, followed by “AVR/GNU Linker -> Libraries” (middle). The only item in the “Library search path” list, “%HOMEPATH%DocumentsAtmel StudioarduinoCore328”, has been selected. The “Edit item” button is shown with a red arrow.
- The user first needs to obtain the source files. From a command line terminal run the following:
git clone –recursive https://github.com/rice-bioe/LPA-hardware.
This should create a folder called “LPA-hardware”.
- Navigate to “LPA-hardwarefirmware”. Open the file “firmware.atsln”. This will open the firmware project in Atmel Studio.
- Open the project properties by clicking on Project -> firmware Properties (or pressing Alt + F7). The project properties panel will open. Click on “Toolchain” on the left (Supplementary Fig. S8).
- On the list in the middle, navigate to AVR/GNU Linker -> Libraries (Supplementary Fig. S8).
- There is one item on the Library search path panel, with the text %HOMEPATH%DocumentsAtmel StudioarduinoCore328 (Supplementary Fig. S8). You need to change this to the folder that you created in steps 1f and 1g. Select this item and click on the “Edit item” button (Supplementary Fig. S8).
- A small window should appear. Enter the path of the folder created in steps 1f and 1g, and uncheck the “Relative path” checkbox. Click on “OK”.
- Go to Build -> Rebuild Solution (or press Ctrl + Alt + F7) to build the project. No errors (messages with red icons on the “Output” panel at the bottom) should occur. Warning messages (yellow exclamation icons) are acceptable. A file called “firmware.elf” inside the “LPA-hardware/firmware/Debug” folder should have been created. You can program this file into the LPA as in the Supplementary Method on firmware programming.
3. Troubleshooting Compilation
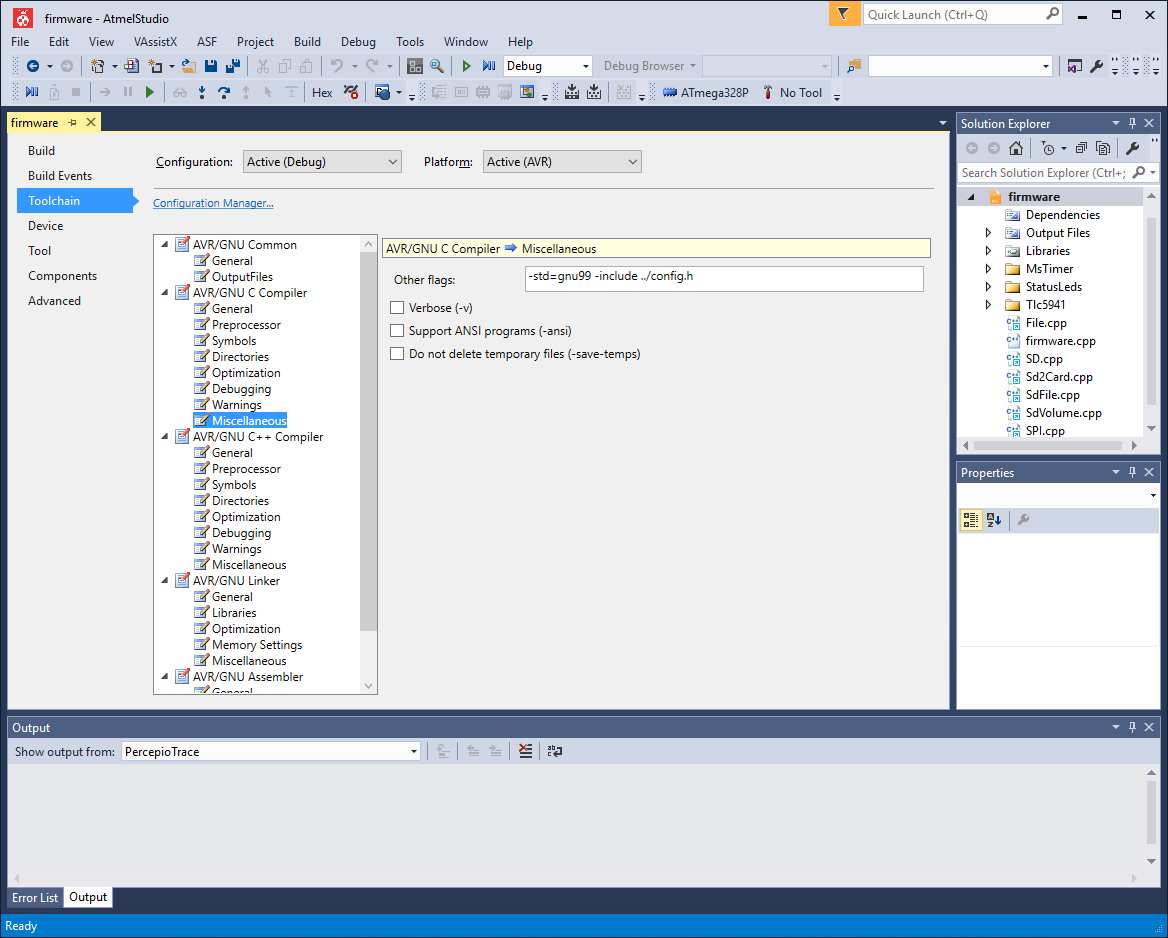
On the firmware project properties panel, the “Toolchain” option (left) has been selected, followed by “AVR/GNU C Compiler -> Miscellaneous” (middle). The figure shows the correct placement of the text “-include ../config.h” inside the “Other flags” text box.
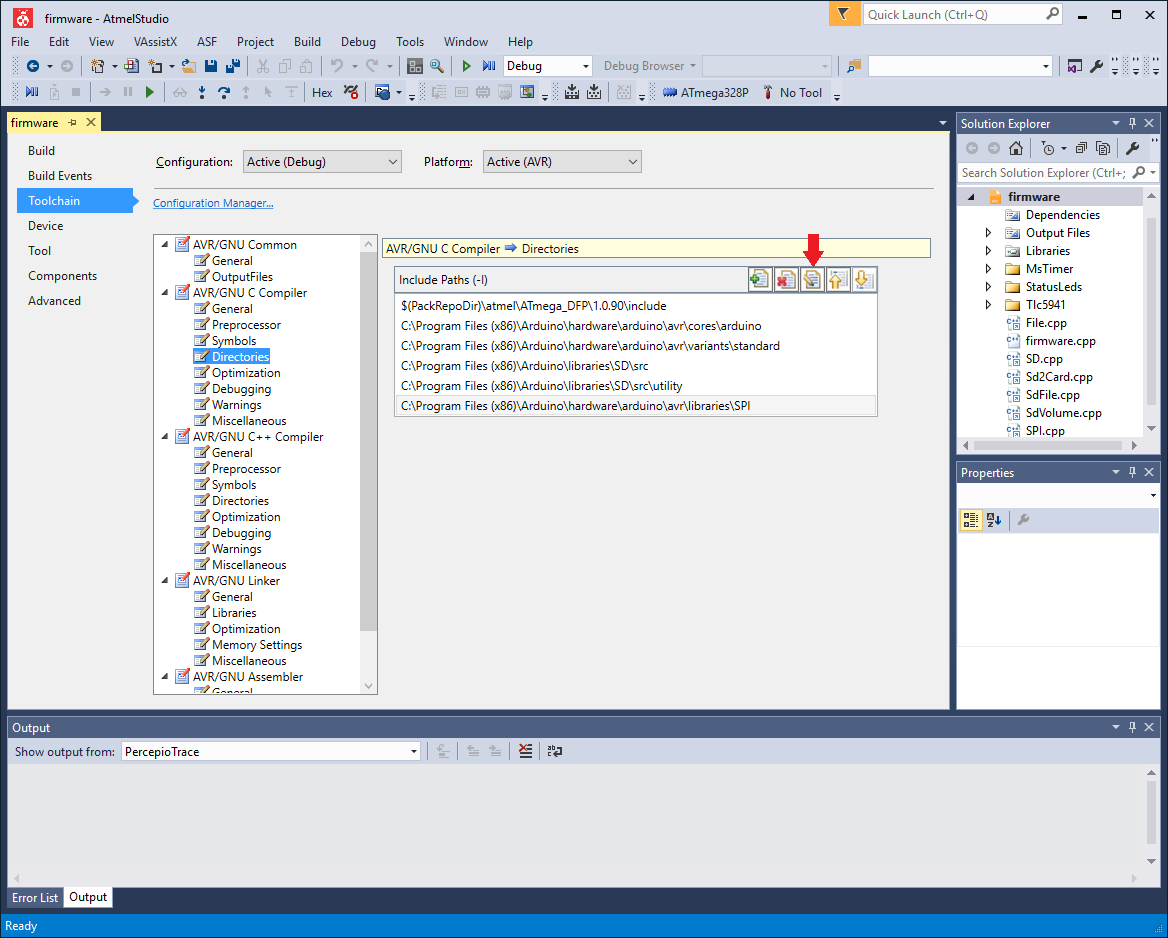
On the firmware project properties panel, the “Toolchain” option (left) has been selected, followed by “AVR/GNU C Compiler -> Directories” (middle). The “Include Paths” list is shown, with the last five entries pointing to Arduino directories. The arrow points to the “Edit item” button.
If step 2g fails, follow the steps below, one at a time, and try step 2g again.
- Go to Project -> firmware Properties, or press Alt + F7. The project properties panel will open. Click on “Toolchain” on the left. Navigate to “AVR/GNU C Compiler -> Miscellaneous”. Check that “-include ../config.h” (without the quotation marks) is added to the “Other flags” textbox (Supplementary Fig. S9). Repeat the same for “AVR/GNU C++ Compiler -> Miscellaneous”.
- Go to Project -> firmware Properties, or press Alt + F7. The project properties panel will open. Click on “Toolchain” on the left. Navigate to “AVR/GNU C Compiler -> Directories”. A list of directories called “Include Paths” will be shown (Supplementary Fig. S10). Check that these entries point to valid locations. As for Arduino 1.6.5, the following directories must be included:
- “{Arduino Installation folder}hardwarearduinoavrcoresarduino”: Contains several header files (.h) and source files (.cpp), including “Arduino.h”.
- “{Arduino Installation folder}hardwarearduinoavrvariantsstandard”: Contains “pins_arduino.h”.
- “{Arduino Installation folder}librariesSDsrc”: Contains the source files of the SD card reader library, including “File.cpp”, “SD.cpp”, and “SD.h”, among others.
- “{Arduino Installation folder}librariesSDsrcutility”: Contains several more source files and headers of the SD card library, such as “Sd2Card.h”, “SdFat.h”, and “SdInfo.h”.
- “{Arduino Installation folder}hardwarearduinoavrlibrariesSPI”: Contains source files and headers of the SPI library, a module that is necessary to communicate with the SD card. Files included are “SPI.cpp” and “SPI.h”, among others.
The default installation folder is “C:Program Files (x86)Arduino”. If you installed Arduino to a different folder, change the entries in this list to reflect that. It is possible that in a version of Arduino different than 1.6.5 the individual folders have been moved within the Arduino installation folder. If the locations listed above are invalid, you should locate the corresponding folders that match the descriptions above. To modify an entry, select it from the list and click on the “Edit item” button (Supplementary Fig. S10).

The Solution Explorer is found in the upper right part of the window. In this example, the file “SPI.cpp” has not been found, which is indicated by the yellow exclamation icon next to the file name.
When you finish, go to “AVR/GNU C++ Compiler -> Directories” on the middle panel and repeat this step.
- Check that the necessary source files from the Arduino SD card library are included for compilation. The following files from the Arduino library should be referenced:
- “File.cpp “. Default location: “C:Program Files (x86)ArduinolibrariesSDsrcFile.cpp“
- “SD.cpp “. Default location: “C:Program Files (x86)ArduinolibrariesSDsrcSD.cpp”
- “Sd2Card.cpp “. Default location: “C:Program Files (x86)ArduinolibrariesSDsrcutilitySd2Card.cpp”
- “SdFile.cpp “. Default location: “C:Program Files (x86)ArduinolibrariesSDsrcutilitySdFile.cpp”
- “SdVolume.cpp “. Default location: “C:Program Files (x86)ArduinolibrariesSDsrcutilitySdVolume.cpp”
- “SPI.cpp “. Default location: “C:Program Files (x86)ArduinohardwarearduinoavrlibrariesSPISPI.cpp”
If you installed Arduino to a different folder than “C:Program Files (x86)Arduino”, the references need to be changed to reflect this. It is possible than in a version of Arduino different than 1.6.5, the files are located in different folders within the Arduino installation folder. If a reference is not found, it will have an exclamation icon next to its name in the Solution Explorer panel in Atmel Studio (Supplementary Fig. S11). To correct this, do the following for each missing file:
- Obtain the true location of the file in the Arduino installation folder.
- On the Solution Explorer in Atmel Studio, right click on the problematic file and select “Remove”.
- Go to “Project -> firmware Properties”, and then to “Project -> Add existing item”.
- A dialog will open to select a file. Navigate to the true location of the file and select it. Click on the arrow next to the “Add” button (lower right of the dialog) and select “Add as link”.