Firmware programming
Note: Windows 7 or later is required to install Atmel Studio.
- Installing Atmel Studio
- To obtain the link to download Atmel Studio, you need to have an account on the Atmel website. Go to https://secure.atmel.com/forms/secure/user-registration.aspx and follow the instructions to set up an account.
- Go to http://www.atmel.com/tools/ATMELSTUDIO.aspx. Scroll down the page, and click on “Atmel Studio 7.x (build xxx) web installer” to download the installer. If you are not logged in, the website may ask you to do so. If everything went correctly, you should now have the Atmel Studio installer on your computer.
- Run the installer. You might see a small window saying “Your license for xeam Visual Installer has expired”. This is an issue on Atmel’s end and should not concern the user. Click on Continue.
- Read and accept the End User License Agreement, and accept the defaults in the next windows. At the end, a confirmation window will appear. Click on “Install”. The installer will now download and install Atmel Studio. This should take around 10 minutes, depending on your connection and computer.
- When installation is complete, a confirmation window will appear. Leave the checkbox “Launch Atmel Studio” on and click on “Close”. This will test that Atmel Studio can be opened successfully.
- If everything is correct, the Atmel Studio window will now appear.
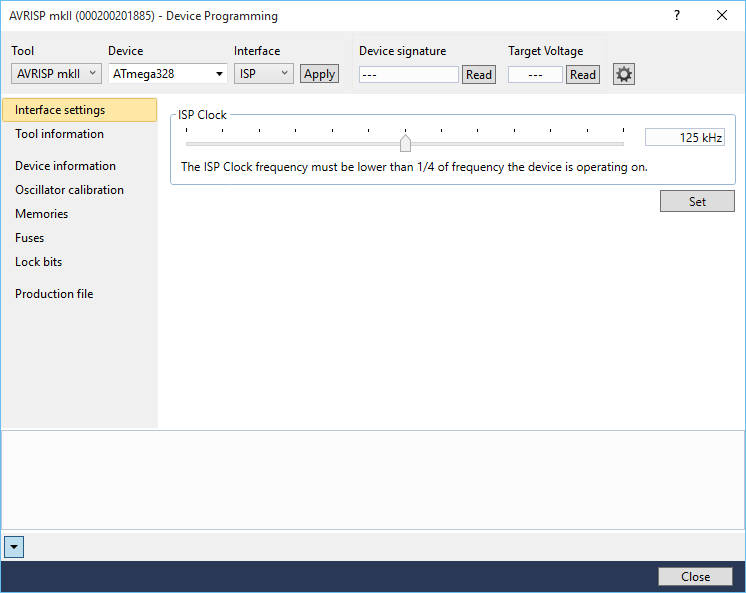
The picture shows the AVRISP mkII programmer selected under “Tool”, the “ATmega328” device selected under “Device”, and the “ISP” Interface selected under ISP. Everything below these options appears after clicking the “Apply” button.
2. Programming the Device This procedure requires an Atmel microcontroller programmer, such as the the AVRISP mkII or the AVR Dragon. This procedure also requires the user to download the LPA firmware files from the Supplementary Files or the LPA website (http://rice-bioe.github.io/LPA-hardware). To program the firmware into the LPA’s microcontroller, follow these steps.
- Make sure that the programmer is correctly connected to the LPA board via the programming connector, and to the PC via USB. Also make sure that the LPA board is connected to a power supply. If you are using the AVRISP mkII programmer, the programming connector is a black 6-pin female connector. This should be plugged into the LPA’s male programming connector such that the red edge of the programming wire points outwards, in the opposite direction of the SD card connector.
- On Atmel Studio, go to Tools -> Device Programming. The “Device Programming” window will appear.
- Make sure that the appropriate tool is selected (e.g. AVRISP mkII). Also, select “ATmega328” under “Device” and “ISP” under “Interface”. Click on the “Apply” button. The window should look similar to Supplementary Fig. S13.
- Click on the “Read” button, next to the “Device signature” box, to the right of the “Apply” button from the previous step. If everything went correctly, the “Device signature” box should be filled, the “Target voltage” should be 3.3V, and no error messages should appear. If there is an error, try selecting ATmega328P under “Device” and repeating from the previous step. If you are still getting an error, close the window and repeat everything from step a. If the error persists, it is likely that the programming connector, microcontroller, and/or power regulator have been soldered incorrectly. Refer to the Supplementary Method on circuit board fabrication and assembly.
- This step is only necessary the first time a new device is programmed. On the “Device Programming” dialog, select “Fuses” from the list on the left. On the “fuse name/value” list that will open, make sure that the CKDIV8 box is disabled, the CKOUT box is enabled, and the SUT_CKSEL box is set to EXTXOSC_8MHZ_XX_1KCK_14CK_65MS. Click on the “Program” button below.
- Select “Production file” from the list on the left in the “Device Programming” dialog. Click on the “…” button located to the right of the “Program device from ELF production file” textbox. Locate file “firmware.elf” inside the “firmware” folder in the Supplementary Files. Click on “Open”.
- Make sure that the “Flash”, “Erase memory before programming”, and “Verify programmed content” checkboxes are activated, and click on the “Program” button. The messages “Erasing device… OK”, “Programming Flash…OK”, and “Verifying Flash…OK” should appear below.